Models
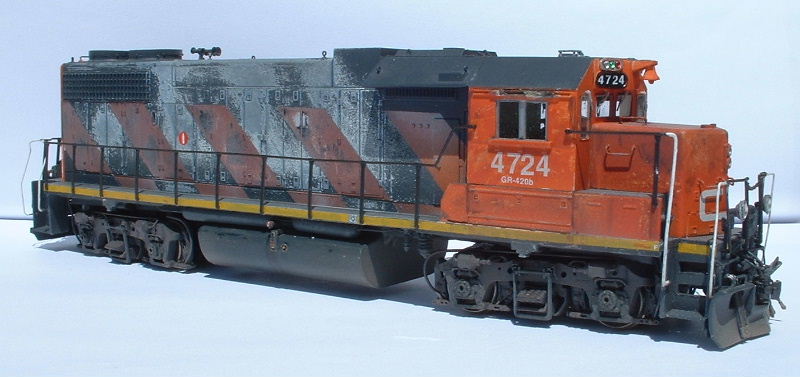
The top photo is the model of GP38-2 4724 after a few months of service. I
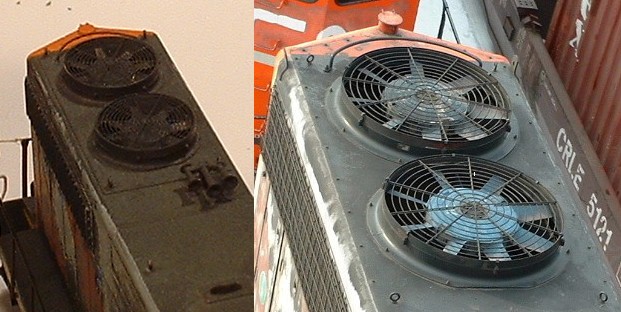
started with an Athearn GP38-2, replaced the fans with Cannon & Co fans. If
you have not seen these yet, check below for a close up picture. I removed the
front number boards and replaced that and the bell and horn with Miniatures by
Eric parts. I added snow shields from Custom Finishings after I had cleaned them
up with a file...extensively. I modified the exhaust to replicate the prototype
with almost no stack. I added Overland brass lights front and rear as well as
for the Sinclair antenna and tank details. I also made my own air tanks from
styrene sprues chucked into my cordless drill and shaped with a file at high
speed. Also known as a poor man's lathe. I added a full interior from Miniatures
by Eric and the front and rear plows. Detail Associates provided the MU hoses
and drop steps. I scratchbuilt my own vertical steps based on photos I had and
bent the vertical part of the end handrails to match the prototype and glued
them into holes drilled in the Delrin handrail set. I bent brass wire for the
sand lines, brake lines and coupler cut levers. Miniatures by Eric supplied the
classification lights and the ditch lights to which I added MV lenses. If you
look carefully at the model you can see the noodle peaking through just as it
does in the prototype photos. This started out as a box stock factory painted Proto 1000 Newsprint car. It
is essentially still that. I added some paintouts and handbent and soldered cut
levers and added the weathering to get here. Nothing really special other than I
like how it looks when you compare it to this. For weathering, I dove into my wife's tole paints and
came up with charcoal, Burnt Umber, Brown Iron Oxide and Red Iron Oxide. I
washed the car down with a 25/75 mixture of charcoal and water after I had done
the paintouts in the upper left corner, data block and over the AEI tag. I wiped
the excess off starting at the top and going straight to the bottom with
slightly damp paper towel until I was happy. I added a little burnt umber at
full strength and wiped from top to bottom. The roof was done the same way but I
only really wanted to keep the colour in joints and seams of the ribs and panels
on the roof. I added the other colours until I was satisfied again. I
oversprayed the car with dullcoat and then used an almost perfect match colour
for the paintout to the lower left of the tackboard by the door. This was after
I covered the rest of the car and only had that spot exposed. Nothing really special other than I was trying out some weathering techniques
again with tole paints. I was happy with this one. It initially had an overspray
of grime and then I added the rest of the colours, working up on the seams at
the bottom and down from the top at the walkway supports using the same method
as the Newsprint car above. The car looks a little bowed from being too close on
macro mode with my digital camera. Sorry. This one was a little more complicated than the last two. This is an Athearn
kit that comes with the metal grabs and stirrup steps that you put on. A little
reasearch into this showed that the model had the incorrect door but other than
that was bang on accurate. After a little searching by Will
Lawrence and myself we found an appropriate donor car in a Roundhouse body.
I cut out the factory door to the edge of the doorframe in the Athearn car and
removed the door from the Roundhouse body, and reorganized the panels into the
correct orientation and then glued some styrene strips around the door to cover
the opening in the Athearn car. I then added the .005" styrene to the bottom of
the door to resemble the reinforcement panel and then matched the paint colour
and sprayed the door after adding the other scratch built details. I think the
colours were a blend of light and dark tuscan red. Weathering hid the subtle
difference. The freshly painted (and replaced) door is pictured to the right. I
also added the full brake gear underneath using brass wire and also added a
walkover platform above the couplers from Plano walkway material. I also added
the walkover grabiron that runs from one side of the car to the other and
handbent and soldered the coupler lift bars per the pictures I could find. I
added some charcoal wash similar to the newsprint car above and again used tole
paints on the roof. I added #58 couplers and some 36" metal wheelsets and it is
ready to hit the road. Here is a pick of the prototype car at Joe Shaw's site.
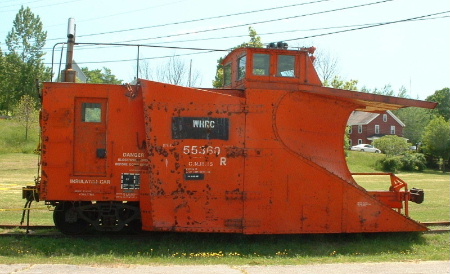
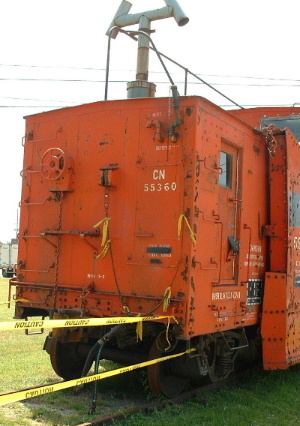
I first saw the prototype plow in Halifax Nova Scotia many years ago, then
one day driving past the Windsor & Hanstport I notice the same plow with
easy access so I took some pictures and here they are. The model started out as
a Walthers Russell snowplow. I cut the body twice to shorten it and the floor
three times (bad planning on my part) and glued them all back together with
reinforcement strips inside. The front coupler box is from Custom Finishings
while I added the lifting features for the front flanges out of styrene and
brass wire. I covered over a side window; one on each side just behind the wings
and one on the non business end where I added some scratch built details and dug
through the parts box for the rest. The smoke jack is scratch built and the
railings are hand bent. The two remaining parts took the longest. The cupola is
scratch built using styrene and lots of putty. So far no shrinkage issues. An
AMM one was available long ago but I did not like the look of it. Next came the
wings. Those are the original wings with the excess detail cut off. The wings
were reshaped to resemble the one on the prototype and then a styrene lip was
added around the edge and more putty was use to fill up to that making the 'kick
out' around the perimeter. I then added some styrene along the edge of the plow
on the body to hide the lip that is prominent on the model but not on the
prototype underneath the cupola. Greg Komar makes excellent decals for these and
they are suitable for other plows as well. I used a Canadian Railway Modeller
article found in the Train 9 Track 5 (February 2000) issue for
reference.CN GP38-2 4724

The Awesome Fans
CV Newsprint Car
CN Covered Hopper
GTRA 2044 PS5344

CN Plow 55360